Với BPM Tutorial: Quy trình xin nghỉ phép, bạn sẽ bước đầu tiếp cận với cách thức mô hình hóa một quy trình công việc trên giấy tờ sang một quy trình đơn giản bằng phần mềm. Dựa trên bộ công cụ Process Desiger - Workflow Center của hãng IBM.
Xem bài viết gốc tại https://viblo.asia/p/bpm-tutorial-quy-trinh-xin-nghi-phep-phan-1-model-the-process-XL6lA2qB5ek
PHẦN I: MODEL THE PROCESS
Mục đích bài học:
- Tạo được Process Application
- Thêm các Team bằng cách thêm Lane và gán team vào Process
- Thêm Activities, events, và gateways vào Process
- Thêm timer itermediate event vào Process
- Tạo biến cho Process
- Tạo Snapshot đầu tiên
Yêu cầu về ứng dụng: Bạn phải có Process Designer (ver 8.6.0) cài đặt trên server có sẵn và đăng nhập bằng trình duyệt web (Tối ưu nhất cho Firefox)
1. Tạo Process Application
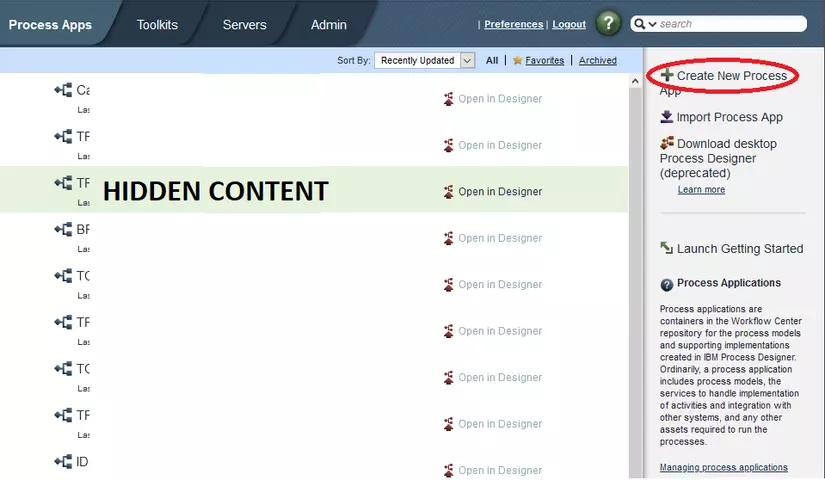
Đầu tiên bạn phải tạo Process application trước khi bạn có thể làm bất cứ điều gì, Process Application được lưu trên Process Center repository.
- Đăng nhập vào Process Center
- Click Create New Process App
- Điền vào thông tin sau:
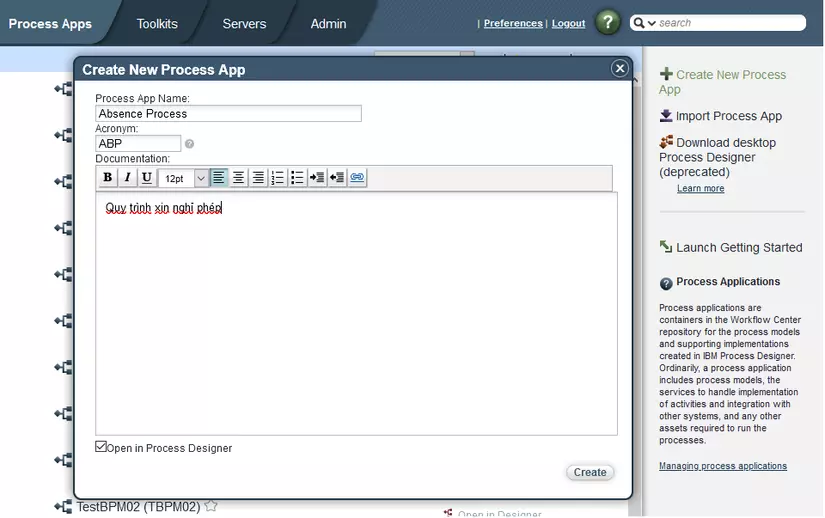
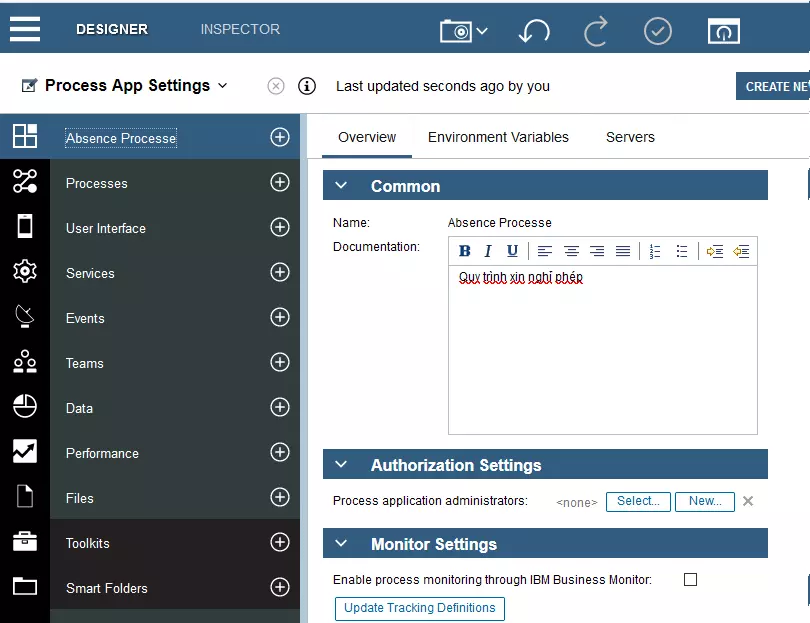
- Click Create, để mở process, Click Open in Designer. Sẽ hiển thị ra Process App Settings
2. Tạo Process
Trong Library (tab chọn 3 dấu gạch ngang), click chọn Processes và chọn tiếp Process và gõ "Absence Management". Màn hình process diagram được tạo ra như sau: 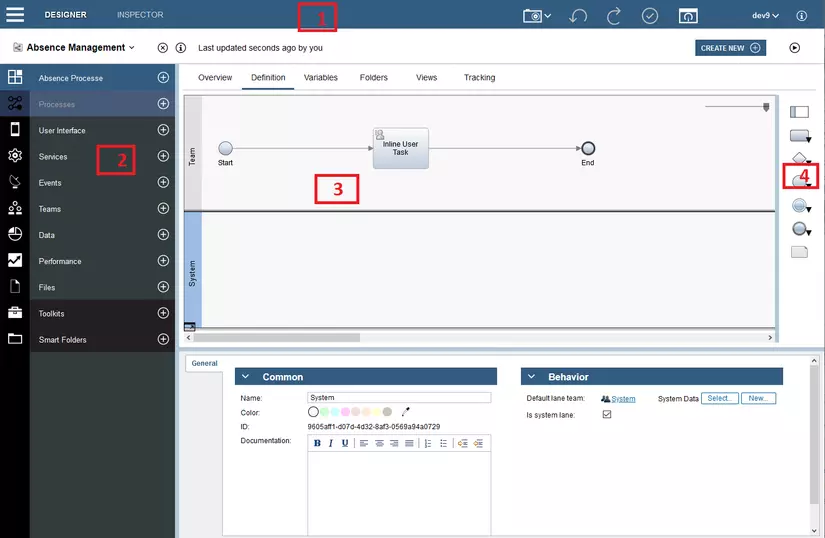
| STT | Area | Chi tiết |
|---|---|---|
| 1 | Main toolbar | Truy cập Designer, Inspector, Optimizer và Process Center. Nút save tất cả các edit, tạo snapshot, help... |
| 2 | Library | Truy cập đến các library item cho process hiện tại |
| 3 | Main canvas | Khu vực bạn có thể mình họa process. Mỗi process được khởi tạo tự động có một start event và end event. Hai lane mặc định bao gồm một cho user và một cho system |
| 4 | Palette | Bao gồm các thành phần để mô hình hóa process |
3. Tạo Team
Dựa vào yêu cầu của process, bạn phải tạo team cho mỗi một vai trò của user: Employee, Manager. Để mô hình hóa team, bạn thêm lane và assign team cho lane đó. Mỗi lane chứa activities thể hiện một thao tác/ thi hành của team hoặc hệ thống (system). Khi bạn tạo Process, Process Designer tạo ra 2 lane mặc định: Team và System. Với Absence Process, bạn phải tạo lane và team như sau: (Đây chỉ là quy trình demo nên ta sẽ sử dụng chính user đang thực hiện develop để gán cho team)
| Lane | Team title | Team properties |
|---|---|---|
| Employee | Employee | Members (chọn user bạn đang sử dụng) Manager bỏ trống |
| Manager | Manager | Members (chọn user bạn đang sử dụng) Manager bỏ trống |
| System | System |
Ta có một số định nghĩa sau đây:
| Khái niệm | Mô tả 2 |
|---|---|
| Lanes | Cung cấp ngữ cảnh cho một mô hình quy trình |
| Teams | Bao gồm member thực hiện các tác vụ được mô hình hóa |
| Members | User groups hoặc user đơn lẻ của team |
| Managers | Manager có thể truy cập Team Performance dashboard trong Process Portal để quản lý |
Cách thức tiến hành:
- Click vào team lane, trong phần General đổi tên thành Employee
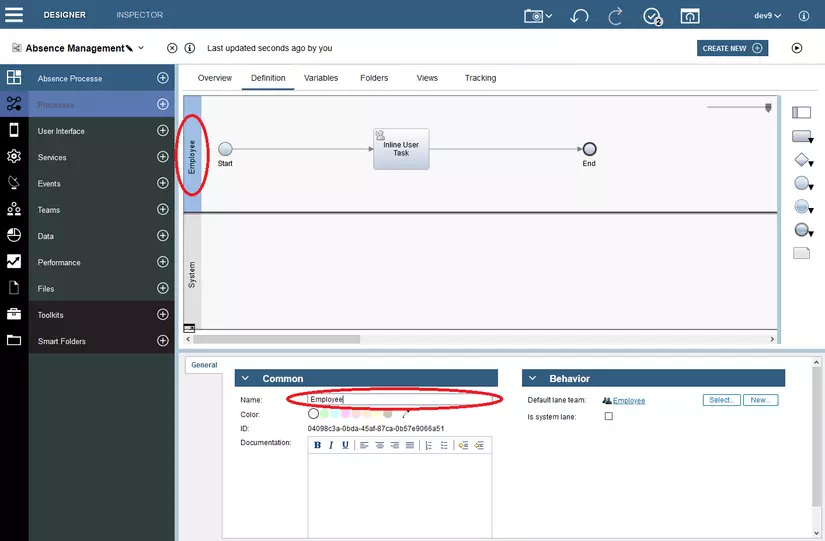
- Tạo team cho lane Employee:
- Trong mục General/Behavior, Default Lane Team click New.
- Điền Employee nhấn Finish.
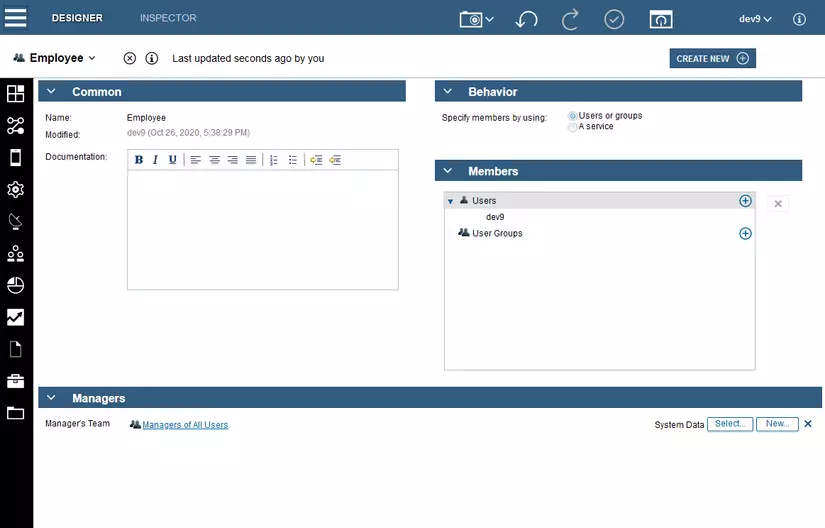
- Trong màn hình hiển thị các thuộc tính của Team Employee, mục Members, User chọn user bạn đang đăng nhập
- Trong mục Managers chọn Manager of All Users
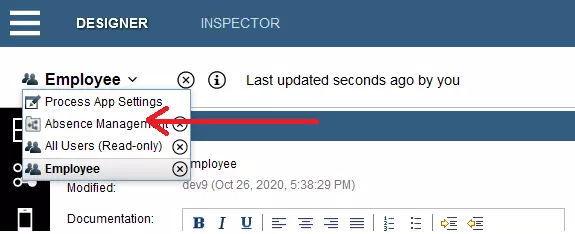
- Ấn vào mũi tên để quay lại process
- Tạo lane Manager:
- Kéo thả một lane từ palette vào trong sơ đồ
- Đặt tên lane Manager, đổi màu trong mục Color thành màu xanh
- Tạo team cho lane Manager: (tương tự bước 2)
- Click nút Finish editting

4. Tạo activity và event
Ta có một số định nghĩa:
| Khái niệm | Mô tả |
|---|---|
| Event | Điều khiển luồng (flow) và các object trong process |
| Start event | Được triggers thời điểm khởi tạo process. |
| End event | Xảy ra khi process kết thúc và tất cả các thành phần trong process kết thúc |
| Activity | Một Tác vụ công việc đơn lẻ mà con người (Human) hoặc hệ thống (System) phải thực hiện trong quá trình process đi từ start đến end. Có nhiều loại Activity |
| User task | Là một Activity kiểu User Task, do con người thực hiện và hoàn thành |
| System task | Là một Activity kiểu System task, do hệ thống tự động hoặc service tự động hoàn thành |
| Script task | Là một Activity sử dụng JavaScript để xử lý |
| Decision task | Là một Activity xử lý điều kiện hoặc quyết định |
Cách thức tiến hành:
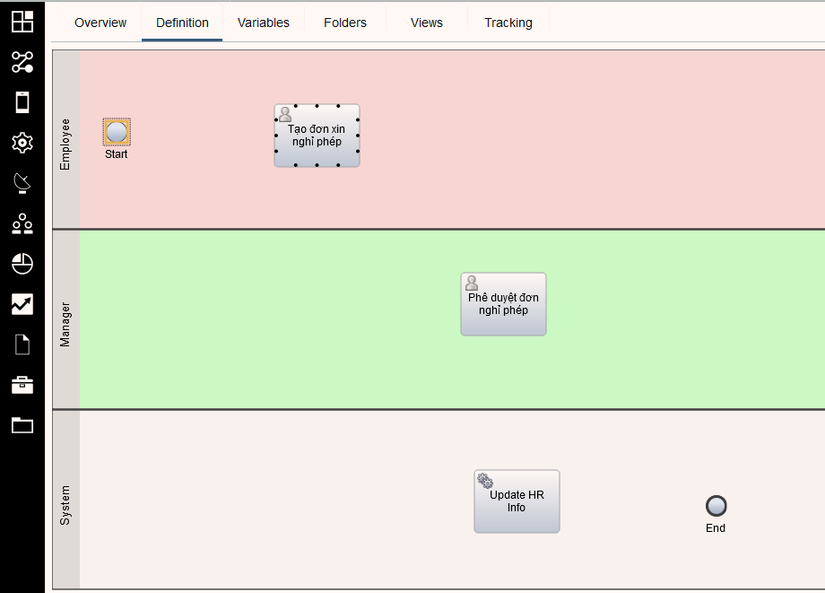
- Xác định team nào sẽ thực hiện các tác vụ: Tạo đơn xin nghỉ phép, Phê duyệt đơn nghỉ phép, Update HR Info. Xem bảng sau:
| Lane | Activities, color, and description | Events |
|---|---|---|
| Employee | Tạo đơn xin nghỉ phép. Màu Red. User sẽ điền vào form và tạo một đơn xin nghỉ phép | Start |
| Manager | Phê duyệt đơn nghỉ phép. Màu Green. User sẽ phê duyệt hoặc từ chối đơn xin nghỉ phép | |
| System | Update HR Info. Màu Default. Từ quyết định của Manager, hệ thống sẽ update thông tin ngày phép còn lại của người dùng | End |
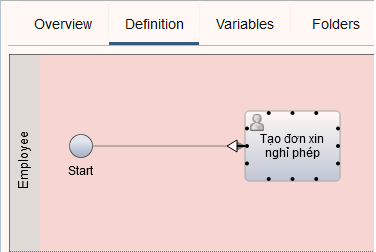
- Mở Process Absence Management, tab Definition
- Xóa Inline User Task mặc định trên màn hình đi, Kéo Activity từ cột Palette vào Lane Employee
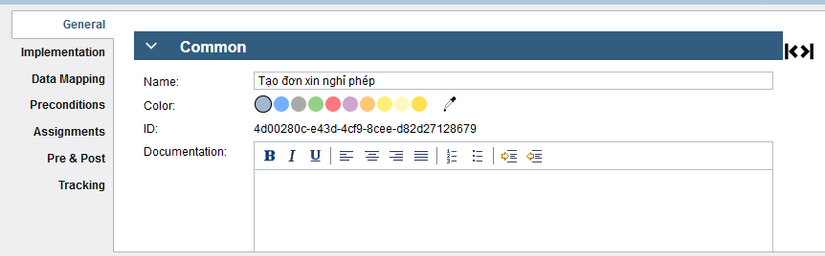
- Trong mục Properties,
- General đổi tên thành Tạo đơn xin nghỉ phép
- Implement Mục Activity Type , chọn User Task (lưu ý là ngoài cách này, có thể nhấp vào mũi tên bên cạnh Activity Palette, chọn User Task sau đó kéo thả)
Add thêm User Task và System Task vào diagram, di chuyển Event Start và End như hình vẽ sau:
Lưu lại
5. Tạo luồng (flow)
Bây giờ trong process đã có activity và event, bạn phải thêm những luồng cơ bản để điều khiển những thứ đó. Luồng điều khiển này sẽ liên kết các activity với nhau và xem rằng ai hoàn thành những activity đó.
Note: Nếu có hơn một đường nối từ một object, thì đường đầu tiên được thêm sẽ là flow mặc định, đường tiếp theo sẽ đi theo một điều kiện nhất định nào đó.
Thông thường, bạn sẽ phải thêm những object để điều khiển luồng, gateway là một ví dụ khi mà có hơn một đường ra cho một activity nào đó. Ta đi qua một số khái niệm sau:
| Khái niệm | Mô tả |
|---|---|
| Flow thông thường |  Một mũi tên chỉ đến bước tiếp theo của tiến trình khi nào mà bước trước đó kết thúc Một mũi tên chỉ đến bước tiếp theo của tiến trình khi nào mà bước trước đó kết thúc |
| Flow có điều kiện |  Một mũi tên tính toán ra biểu thức theo điều kiện và kết quả tính toán quyết định đường đi tiếp theo khi điều kiện được thỏa mãn Một mũi tên tính toán ra biểu thức theo điều kiện và kết quả tính toán quyết định đường đi tiếp theo khi điều kiện được thỏa mãn |
| Flow mặc định |  Một mũi tên với nét kẻ gạch ở đầu, mô tả một đường đi mặc định khi không có điều kiện nào được thỏa mãn Một mũi tên với nét kẻ gạch ở đầu, mô tả một đường đi mặc định khi không có điều kiện nào được thỏa mãn |
Cách thức tiến hành:
- Mở Process Absence Management, tab Definition
- Trong Process Diagram, di chuyển chuột đến Start và click vào điểm kéo thả để tạo điểm đầu của mũi tên.
- Kéo con chỏ chuột về điểm chọn của Tạo đơn xin nghỉ phép và click lần nữa.
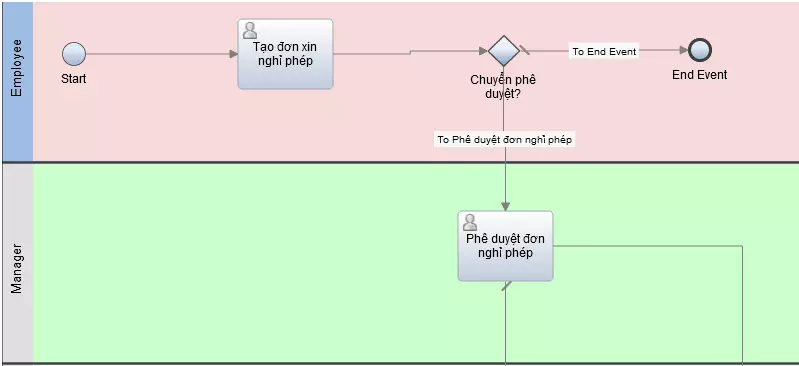
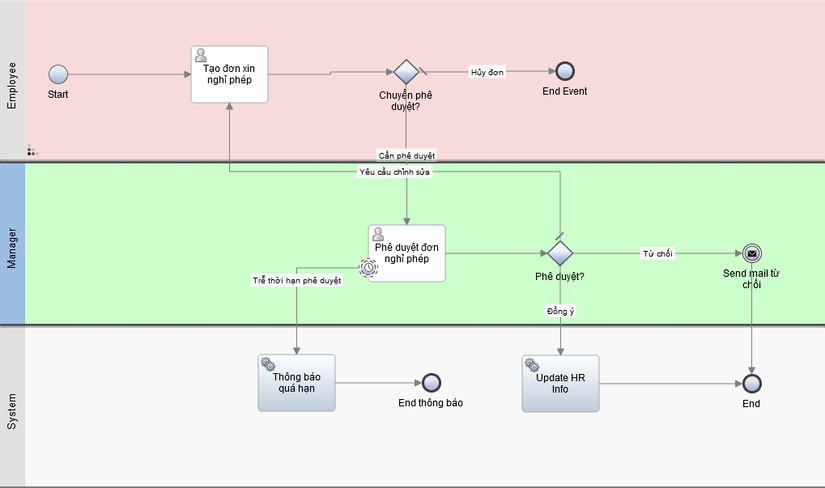
- Tương tự vậy, ta kết nối Tạo đơn xin nghỉ phép với Phê duyệt đơn nghỉ phép và nối Phê duyệt đơn nghỉ phép với Update HR Info, nối đồng thời Phê duyệt đơn nghỉ phép và Update HR Info với End ta được như hình.
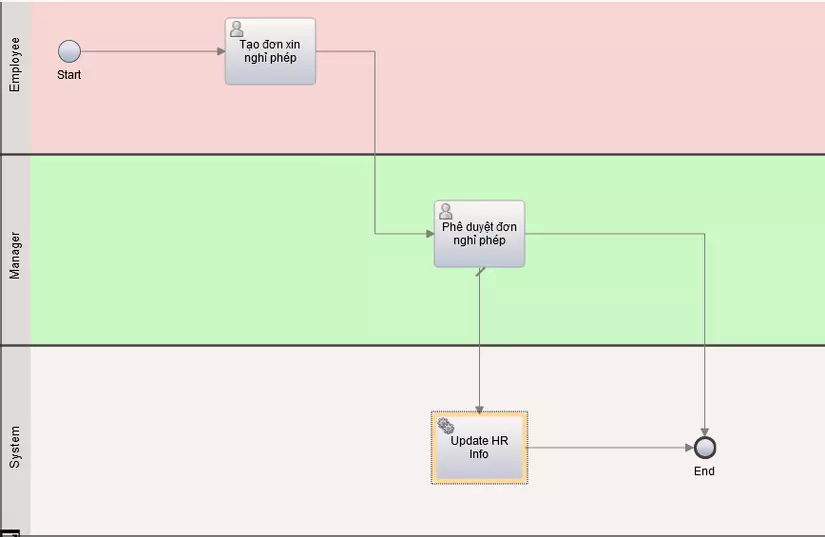
- Lưu lại.
6. Tạo event gateway
Event gateway thể hiện một điểm rẽ nhánh trong process, nơi mà chỉ có một hoặc một vài flow được đi theo, phụ thuộc vào sự kiện (điều kiện) đang diễn ra. Để đơn giản hóa diagram, gateway thường được đặt lên tên một câu hỏi còn các đường ra có thể là câu trả lời tương ứng. Trong Absence Management, bạn cần tạo hai gateway sau đây:
- Chuyển phê duyệt ?: Nếu như yêu cầu nghỉ phép được điền đủ thông tin và sẵn sàng thì gửi tới Manager, nếu như muốn hủy ý định nghỉ phép thì đơn xin nghỉ phép sẽ bị hủy
- Phê duyệt ?: Có ba trường hợp xảy ra: Nếu như Manager đồng ý duyệt, luồng sẽ đi tới thông báo cho HR, và trừ ngày phép. Nếu không đồng ý thì luồng sẽ email thông báo cho nhân viên. Nếu yêu cầu chỉnh sửa thì luồng sẽ trở lại Tạo đơn xin nghỉ phép.
Ta có khái niệm:
| Khái niệm | Mô tả |
|---|---|
| Gateway | Điều khiển luồng của process, ví dụ như tụ hồi/ phân kỳ luồng, xác định, rẽ nhánh, hợp luồng. Có hai kiểu gateway chính: phân chia và tập hợp. Nghĩa là gateway có thể chia luồng thành nhiều luồng nhánh khác nhau hoặc có thể hợp nhiều luồng khác nhau thành một luồng. Do đó có hai loại gateway: exclusive và parallel (độc nhất và song song). |
| Exclusive gateway | Dẫn quy trình đi qua duy nhất một luồng. Sau khi điều kiện thỏa mãn, duy nhất một luồng điều kiện được đi theo, nếu không có điều kiện nào được thỏa mãn thì process đi qua default flow |
| Parallel gateway | Parallel gateway dẫn process qua tất cả các luồng của parallel mà không có điều kiện nào cả. |
Cách thức tiến hành:
Mở Process Absence Management, tab Definition
Kéo thả Gateway từ thanh Palette đến khu vực phía bên phải của Tạo đơn xin nghỉ phép. Điền Chuyển phê duyệt? vào mục tên.
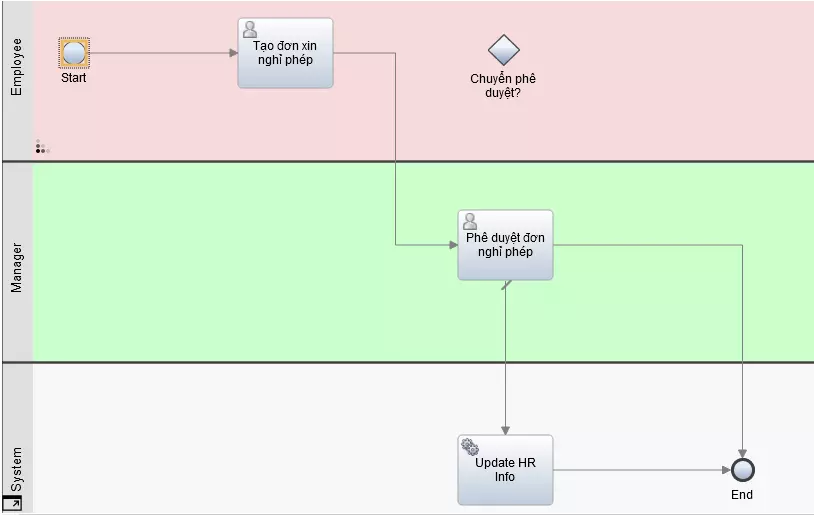
Kết nối gateway:
- Click vào luồng nối từ Tạo đơn xin nghỉ phép và Phê duyệt đơn nghỉ phép, nhấn Delete
- Kết nối Tạo đơn xin nghỉ phép với gateway Chuyển phê duyệt ?
- Kéo thả từ thanh Palette một End Event, nối gateway Chuyển phê duyệt? với End Event, tiếp tục nối gateway này với Phê duyệt đơn xin nghỉ phép.
- Đặt tên cho luồng
Click vào luồng nối giữa Chuyển phê duyệt? và End Event
Trong mục Properties/ General đổi tên thành Hủy đơn, hãy đảm bảo rằng bạn đã tick vào box Name visible để hiển thị tên của luồng lên diagram.

Tương tự vậy click vào luồng nối giữa Chuyển phê duyệt? và Phê duyệt đơn nghỉ phép, đổi tên thành Cần phê duyệt
- Lặp lại bước 2 và 3 để tạo gateway Phê duyệt? được kết nối sau Phê duyệt đơn nghỉ phép
- Sẽ có 3 khả năng xảy ra ở gateway này
- Yêu cầu điều chỉnh: nối Phê duyệt? trở lại Tạo đơn xin nghỉ phép
- Từ chối: Kéo từ Palette ra một Intermediate Event/ Message(sending) và nối Phê duyệt? với event này, sau đó nối từ event này tới End
- Đồng ý: nối từ Phê duyệt? tới Update HR Info rồi tới End

- Lưu lại.
7. Tạo timer intermediate event
Trong phần này ta sẽ đặt một Timer intermediate event, sẽ được khởi chạy khi Manager lưu giữ đơn nghỉ việc quá lâu mà không có động thái phê duyệt/từ chối... Một số khái niệm:
| Khái niệm | Mô tả |
|---|---|
| Intermediate event | Xảy ra giữa Start event và End event của Process. Có 3 loại: timer, message và error. Ta sử dụng intermediate event để thực hiện các service vào thời gian cụ thể nào đó khi điều kiện được đáp ứng. Intermediate event có thể nằm trong luồng hoặc được gắn vào Activity |
| Timer intermediate event | Được sử dụng để xác định thời gian chính xác trước khi một hành động nào đó xảy ra |
| ECM Content intermediate event | Khi nhận được một ECM Content message thì sẽ thực thi hành động tiếp theo |
| Message intermediate event | Gửi hoặc nhận message |
| Error intermediate event | Dùng để xác định những exception có thể xảy ra khi mà process đang chạy và xử lý các exception đó bằng các error handler activity, sub process hoặc flow |
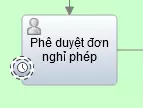
Kéo từ Palette ra một Intermediate Event/ Timer , gắn vào Activity Phê duyệt đơn nghỉ phép . Lưu ý là phải gắn vào viền Activity mới đúng.
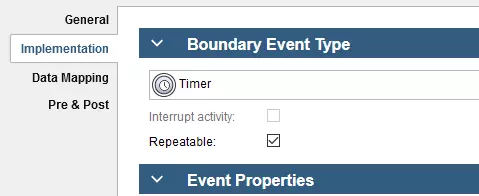
Trong mục Properties/ General đặt tên event là **Quá hạn phê duyệt **.
Trong mục Properties/ Implementation bỏ tick ô Interrupt Activity, giữ tick vào ô Repeatable.
Note:
- Nếu ta chọn Interrupt activity, thì Timer này trigger là Activity Phê duyệt đơn nghỉ phép cũng đóng luôn, ta phải bỏ chọn nút này bởi vì ta muốn Manager vào thực hiện tác vụ khi nhận được thông báo.
- Nếu ta bỏ chọn nút Repeatable, thông báo sẽ chỉ được gửi duy nhất một lần. Nếu ta chọn nút này, thông báo sẽ được gửi cách nhau một khoảng thời gian xác định cho đến khi Activity được hoàn thành.
- Thêm activity Thông báo quá hạn
- Kéo một activity System Task từ palette đến System lane , bên trái của Update HR Info
- Đặt tên cho activity là Thông báo quá hạn
- Kết nối Timer với Thông báo quá hạn
- Đặt tên cho luồng nối giữa Quá hạn phê duyệt và Thông báo quá hạn là "Trễ thời hạn phê duyệt" và tick vào Name visible. Mục Type, chọn Exception Path

- Thêm một End event vào trong luồng, kéo thả từ palette vào bên phải của Thông báo quá hạn và nối từ đó vào End event luôn, đặt tên End event này là End thông báo Diagram sẽ nhìn như sau:
- Lưu lại.
8. Tạo biến process
Ta cần vài biến Private để mô tả, thể hiện đơn xin nghỉ việc cũng như các quyết định trong gateway.
- absenceRequest
- managerDecision (lưu ý quy tắc đặt tên biến theo camel case) Ta đến với các khái niệm:
| Khái niệm | Mô tả |
|---|---|
| Variables | Nói một cách lý thuyết, biến là cung cấp data về ngữ cảnh hiện tại của process đang chạy. Sử dụng biến, process truyền dữ liệu từ step này đến step khác. Có 3 loại biến bên dưới: |
| Private variables | Biến process hiện tại cần hoặc service cần |
| Input variables | Biến được truyền vào process hoặc service |
| Output variables | Biến được truyền ra process hoặc service |
Cách thức tiến hành Tạo biến:
- Mở Process Absence Management, tab Variables
- Click vào dấu cộng trong mục Private để thêm biến private, nhập absenceRequest, tạo thêm biến nữa managerDecision
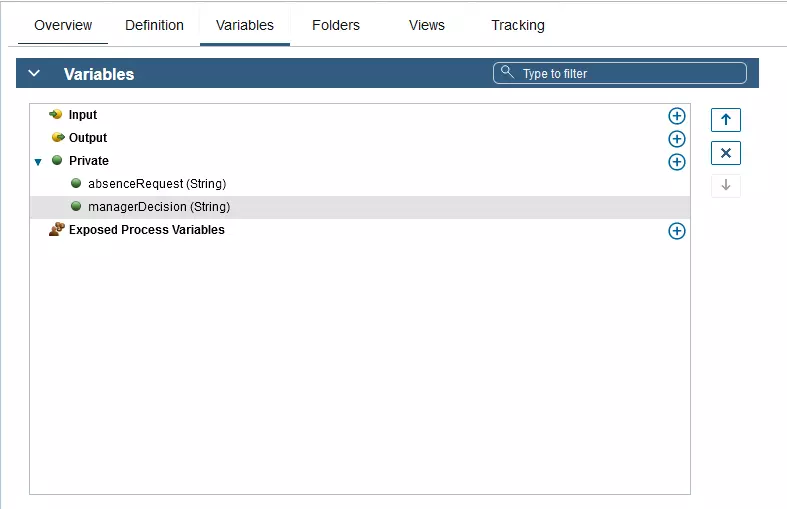 Lưu ý ta vẫn để kiểu dữ liệu của biến là String (mặc định) vì sẽ thay đổi nó trong phần sau, khi tạo Business object.
 - Lưu lại.
9. Tạo process snapshot đầu tiên
Snapshot là một trạng thái của library item trong process trong một mốc thời gian nhất định. Bạn có thể tạo snapshot trong Process Center hoặc trong màn hình Designer. Việc quản lý đối với mỗi snapshot như install, export, archive,... được thực thi trong Process Center. Cách thức tạo snapshot
- Kiểm tra lại process
- Trong Process Designer, click vào biểu tượng trên
 main Toolbar / Create a new Snapshot
 - Điền 0.1 vào mục tên và click Finish


